How to improve Core Web Vitals and page load speed
It became a very important topic when Google began baking this into their core ranking algorithm in 2020. Long ago, they said “The web should be fast.” When Google speaks, it is important to listen – if you wish to prosper online. Although improving page load speeds can result in better rankings, the other equally important aspect to address is Visitor Experience.
There are few people who enjoy watching rust form, and slow to load web pages engender similar feelings… At the same time, through 2016 the average web page size continued to grow, now at 2.33 Megabytes.
- An increase in load time usually results in decreased revenue for e-commerce sites – Amazon say 100ms extra load times costs 1% in revenue!Conversely, making the site faster improves revenue…
- Website visitors subjected to your slow loading website are far less likely to return, directly impacting your website’s success – and not in a good way!
- Other indicators that should be positively impacted are bounce rates, visitor retention times, repeat visitor rates.
As part of all my small business web design packages, page load speed optimisation is addressed.
How to Improve Website Performance?
When you start considering how to improve website loading speed, there are multiple elements to examine. Having a plan of attack helps immensely. The following strategy is how a freelance NZ website designer should approach the task;
- Benchmark – run performance tests on any/all of the services listed below. Copy and save the results. This will be the base measurement against which you judge the results of the improvement work you will do.
- Caching – assuming you have not yet installed a caching system, that is the next step. If using WordPress, start with the $39 WP Rocket Cache because it delivers better performance than it’s competitors. *
- Plugins – Godaddy produced the P3 Plugin Profiler to determine what plugins are hogging resources. If you have any greedy plugins, either find a light-weight replacement. Deactivate and delete plugins that are not mission-critical.
- Image Sizes – make sure they are sized correctly and compressed appropriately. Specify image pixel height and width so that text content can flow around the image space before images load. Use a “lazy load” plugin to only display images as they enter the viewport. (Some caching plugins include lazy load)
- Home Page: are you opening a basket full of recent posts, top 10 posts, posts from various categories, comments, featured pages? That is database-intensive content which quickly adds up in terms of total database requests.
Website Performance Benchmarking
When you are making changes, it is important to check at each stage that what you have just done had a positive result. Fortunately, the web offers a plethora of measurement services. It is important to remember that there are lots of variables, such as;
- Location of the test server vs location of your website
- Connection – dial-up, cable, ADSL, unthrottled etc
Because of this, results do vary between the various measuring services. Don’t worry about the inconsistencies, just focus on the overall load speed trends. Here are the most popular testing platforms;
- Pingdom: performance checks from multiple locations; http://tools.pingdom.com/fpt/
- GT Metrix: a free website speed checking system by a Canadian hosting company: http://gtmetrix.com
- Dotcom Tools: website load speed tests across multiple countries: https://www.dotcom-tools.com/website-speed-test.aspx
- Web Page Test: http://www.webpagetest.org
- Sucuri Performance: performance checks from multiple locations; http://performance.sucuri.net/
BENCHMARK WEBSITE PERFORMANCE
Run the initial test on 3 or 4 services before you start making changes.
The process makes more sense if you;
- Note exactly what you did to optimize website performance
- Record the result each time you check page load time…
Generally, work on two pages – Home page and an internal page – to monitor page load times after each stage.
Reduce Website Load Speed with Caching
There is no disputing the dramatic benefits that a good caching system can deliver.
User of the popular WordPress CMS system are spoiled for choice with caching plugins. W3 Total Cache, WP Super Cache and Quick Cache are three I’ve used extensively.
For non-WordPress sites, caching systems may also be available, depending on the CMS you are using. Even if that”s not possible, there are still many opportunities to minimise load times! Implementing Gzip file compression can usually be done in the .htaccess file, and you can certainly tackle image file sizes!
Plugins – Impact on Page Load Time
Not all plugins are beneficial to performance. A plugin has a quantifiable impact on page load speed, page file sizes and database requests. Indeed, some add hundreds of lines of code to every page, and trigger high volumes of database requests. This can cripple “shared hosting” web servers, and some hosting companies have banned such plugins.
The worst culprits are invariably broken link checkers and related content generators.
PLUGIN PROFILER
Use Godaddy’s P3 Plugin Profiler to determine which plugins on your site are burning up the most resources. The pie-chart graphics show clearly;
- % of resources consumed by plugins in total
- % of resources consumed by each plugin
Should any plugin be consuming a much bigger wedge, consider the alternatives.
Be very careful of Jetpack – it is the Swiss Army knife of plugins but is very resource-hungry!
SECURITY PLUGINS
Some security plugins include features that you don’t need to run all the time. For example, the respected Wordfence plugin offers Live Traffic logging which is a bit resource hungry. Turn it off if you don’t need it. The scanner has options for image file scans and ultra-sensitive modes – run those once, and then deactivate them to reduce resource consumption.
If one of your plugins is a Web Application Firewall (WP Ninja or Block Bad Queries), don’t use another plugin that also has a WAF – or deactivate its WAF function.
HEARTBEAT CONTROL
The WordPress Heartbeat API can sometimes generate high server loads, negatively impacting performance. that slow things down significantly. If you suspect that’s happening, there is a Heartbeat plugin that can minimise this issue.
Images – Dimensions & File Sizes
A great way to trash page load times is uploading images straight from your camera or phone. Your website software probably does not work like social media sites, here images are automatically resized and compressed.
- be reduced to the maximum size that they will be displayed at
- be compressed by at least 10% and in most cases 30% still offers good image quality
- have its dimension specified in the page/s within which it is displayed
Basically, you cannot upload an image the exceeds the maximum permitted image file size
Batch Processing existing Images in Bulk
There are good plugins for automatically processing images across your website.
SHORTPIXEL
My go-to tool is the Shortpixel plugin – https://shortpixel.com and I extend the default limited number of image with a 50,000 Image Processing Plan for $30. The plugin can be installed with the same API key on multiple sites and the 50k Image Plan can be shared across all those sites.
- configure the plugin settings for glossy or lossy compression
- set the maximum image size etc
- set it to work.
Shortpixel does a wonderful job of optimising and compressing your entire image library!!
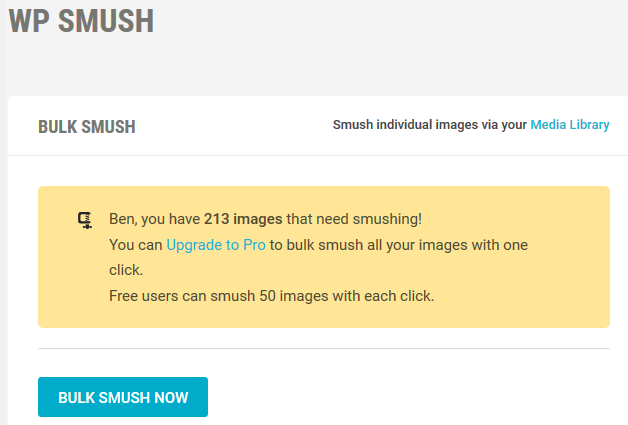
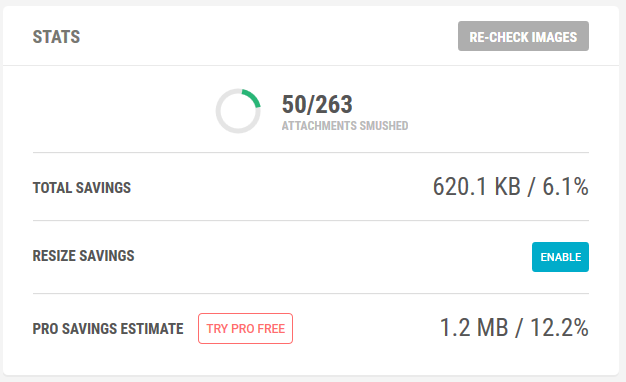
WP SMUSH
This tool allows you to reduce image file sizes, improve performance and boost your SEO using the WordPress Smush API. It analyses new images on upload and will compress them on the fly as/if appropriate. After installation, images can be processed in bulk;
PERFORMANCE TESTING TOOLS
Where you see a recommendation in GT Metrix or other load speed results relating to “optimise images” you could examine the list to see if there are any very large ones that you can process. The only option is one by one, which is why a fully automated batch-processing tool is a godsend!
- Click the “See optimised version” to open the compressed file
- Right click the image and select “Save as” and make sure the name is identical to the original version
- Use your FTP software to upload the optimized files to the original folder
Each image that is being scaled should be resized to the correct dimensions. Some design themes are not efficient at displaying images, so if there is a site-wide issues with images being scaled, you may need to consider a better design theme. In general, mobile-responsive design themes are engineered specifically to process images in a way that reduces page load times across all viewing devices.
Retina Ready Images:
Not everyone understands that this is Apple marketing at work. It’s a gimmick, where only enabled devices might theoretically show a photo-realistic image… Loading retina-ready images onto the average website is verging on stupid… Yet some website designers will tell you its essential. On the average website’s traffic logs, you will see that Apple visitors make up less than 6% of total visitors. Of those, a very tiny percentage actually have retina-ready devices!
Home Page – Constrain Complexity
Bear in mind that the Home page is the single most important page. It is where most visitors touch down!
When planning how to improve website loading speed, remember that a fast Home page is crucial to keeping a visitor’s attention long enough grab their interest. Achieving a compromise between highlighting site content and loading it as fast as is possible is the conundrum.
- Don’t load the Facebook Statistics for your Fb Business page, only show the Follow buttons
- Same goes for Tripadvisor etc
- If you are running Ads, check what impact your suppliers code is having
- If you are loading external fonts and icons, see if your caching plugin can cache them


